Gardening Centers are great. For the plant lover, they offer rows and rows of annuals and perennials and shrubs, often bursting with color, to entice one to take them home. The downside, however, is that there’s little variety. Garden Centers need to make surefire income to stay opened, so they mostly grow what sells easily, and the more unique plants remain pictures in the catalog. Ah, but you need not be a victim of this narrowing of choice! You have within your grasp the power to have almost any plant you desire! That power is: grow from seed. It’s not hard, and the rewards are great. Here are the steps below, complete with pictures.
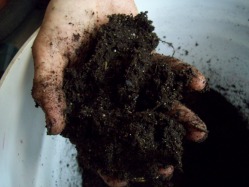
Step 1. Buy a good potting soil. Add water and stir. It should not be crumbly, but neither should it be soggy. Just wet enough to hold together when you squeeze it, but crack into a few large chunks when you open your hand. You must do this first, since potting soil does not wet easily. It is designed that way, so that it also does not dry out too easily, either. Once the soil is right (if too wet, wait for it to dry out a bit – maybe the next day) fill your pots. I save and re-use the six-packs I get from seedlings, but I have also used yogurt cups and cardboard egg-cartons. They actually work great for seeds whose instructions say "do not disturb the roots when transplanting." Since they biodegrade, you can tear them apart, enlarge the hole in the bottom or tear off the walls a little, and put them right into the ground.
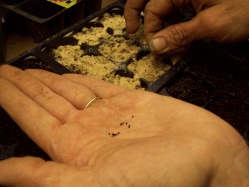
Step 2. OK, now for the fun part. Read the back of the seed package for planting instructions and plant the seeds to the level the instructions say. Rule of thumb if the instructions don’t say – tiny seeds are barely covered with soil, larger seeds are planted at least as deep as their diameter. If the seeds are tiny and dark, you may want to put on a thin layer of sand to help you see. In general, plant several seeds in each pot, because not all will sprout, and not all that sprout will be sturdy. Remember to label your pots, or you'll have mystery plants!
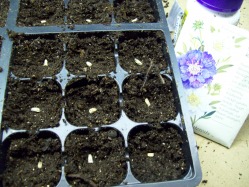
These are seeds of the perennial Scabiosa, a beautiful flower with an ugly name. I planted one in each to make it pretty for the picture, and also because I planted more pots than I ultimately wanted, expecting some not to sprout. Most did, but I did not have to transplant them (step 5), which was handy, since I had two dozen other varieties to transplant!
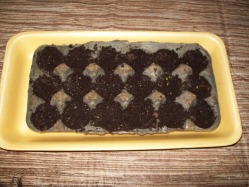
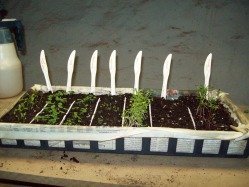
Here are some larkspur seeds growing in an egg carton with a (well washed) meat tray underneath. Recycling is a good thing!
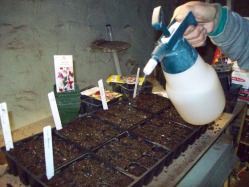
Step 3. Water the pots lightly. I use a mister, and that really works well, preventing the plants from getting too wet and drowning. Using a watering can is not recommended, as the water will come out too hard. Another good method is putting water in a pan underneath and adding water to that, but be sure not to overwater.

Here is a handy gadget – the pots sit on a mat that is in a pan of water. The mat soaks up the water through wicking-action. Works great.
Step 4. Put them under grow lights, VERY close to the surface of the pots (sorry, I forgot to take a picture of that!) They have to be very close so that the seedlings don’t get "leggy" – way too long, stretching for the light. It’s ok, the florescent lights don’t put out heat, so they won’t burn the plants. If you take good care of them, they will grow nicely and look like this after a few weeks (I ran out of pots! This actually worked very well. Drawback – plants that grew quickly and could be transplanted early grew with those that needed a few more weeks, so I had to keep this under the lights longer, along with transplants in separate pots. Got pretty crowded.)
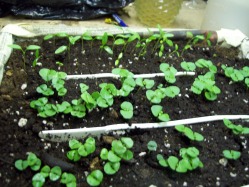
Here are some basil and parsley seedlings growing very nicely under lights. Normally I just buy a few plants, but this year I wanted to sell greens at the farmer's market along with flowers, so I needed a whole lot!
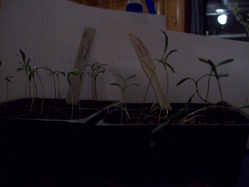
Here are some cosmos. Very leggy, no matter what, but the ones on the right were grown under two "cool light" flourescent bulbs, and the ones on the left were grown under one "cool" and one "warm", supposedly giving full spectrum light. The picture does not do it justice, since the ones on the right are actually much longer than they appear, they are just half lying down. Most seedlings do just fine under cool lights, but some will be happier with full spectrum. In the end, however, both grew fine outside, and that's the goal!
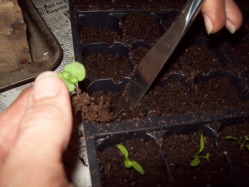
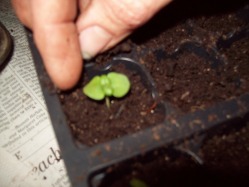
Step 5. Transplanting time! This is fun. Choose healthy, strong seedlings, after at least the first set of true leaves appear. Make a little hole in your moist potted medium (ie soil) with a knife or other pointy object. (You will have followed step 1 above for these new pots, right?) Carefully work the seedling out of its first pot, using that pointy tool again to scoop it out rather than pulling it up! Try to have soil on the roots. Ideally you should not hold a plant by its leaves, but seedlings are so light that it’s not a problem. Just support the stem with your other fingers. Carefully place the seedling in the hole, letting the roots go in straight, and firm the soil around it. You should plant it at the same level it grew, but if my seedlings are leggy (a real problem with cosmos) I sometimes plant them deeper to shorten the stem. This has never been a problem for me with leggy seedlings, but as a general rule, plant things at the same level.
Step 6. Put these little babies back under the grow lights until they get a little stronger, or until they can be put outside to "harden."
Step 7. Harden the plants. (oops! Sorry, forgot to take a picture again!) This means taking them outside on mild days in early spring. Take them out for only the day, then bring them inside at night. Do this for about a week, then leave them out overnight when no frost is expected. They should be strong enough now to stay outside, but be sure to bring them in if you are expecting frost! They’re not THAT strong. Water daily, especially if in the sun. Semi-shade is best. Before I had a patio I would put them next to the picnic table on the ground. They would get a few hours of sun, then they would be shaded during the heat of the day. Watch them, though! There is very little soil, so even if you water them in the morning, if it’s very sunny they could be dry by the afternoon, and there goes all your hard work!
So there you have it. It sounds harder in writing than it really is. And you will love the freedom of being able to grow whatever you want! Well, almost whatever. Nature does have its limits, but most seeds will love you!
So there you have it. It sounds harder in writing than it really is. And you will love the freedom of being able to grow whatever you want! Well, almost whatever. Nature does have its limits, but most seeds will love you!
 RSS Feed

